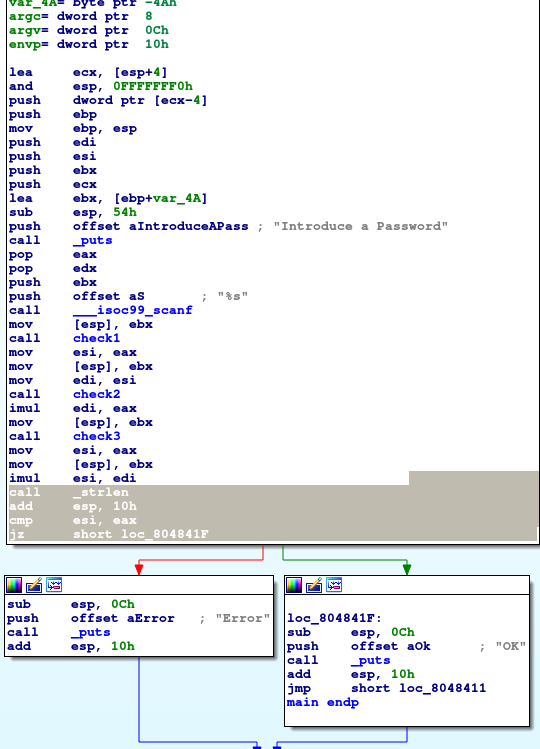
The final part in my coursework, onto the final binary! Let's start by looking at the binary in graph mode in IDA:
 Figure 1: Examining the
 main function in Ex3_2.
From a brief overview, we can see that there are now 3 check functions instead of 2 in the previous binary.
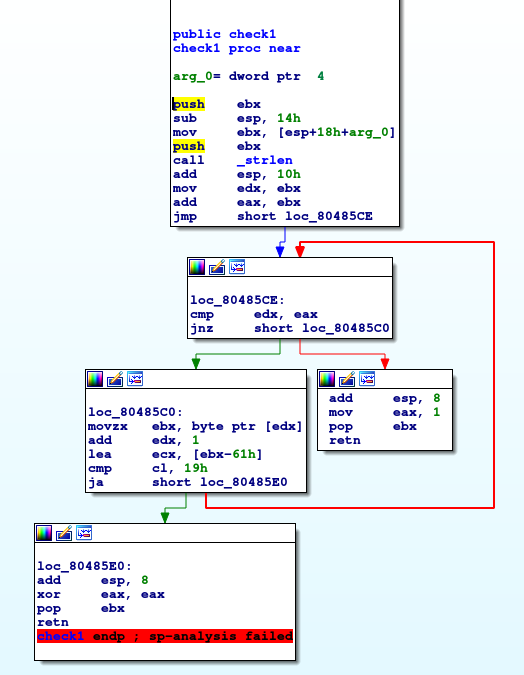
Let's examine the check1 first.
 Figure 2: Examining the
 check1 function in IDA.
This function seems to be awfully similar to the check1 function in Ex2_2. Infact it is symantically the same (at least I think it is). The way I noticed it was because of the subtraction of 0x61, comparing the value of the
result to
0x19 and seeing it if is less than 0x19.
To recap this function for the benefit of the reader, this function simply checks whether all the characters in the entered input are all lowercase characters.
Following this, all we need to check now is what the return values for this function are for when the input consists of all lowercase characters and not.
We can see that when the entered string is not all lowercase, the function returns 0, signified by xor eax eax which is always 0. We know this because of the ja instruction before the jump
when the
character is 'invalid'.
Else the function returns 1, which happens when the loop has iterated through all of the entered string.
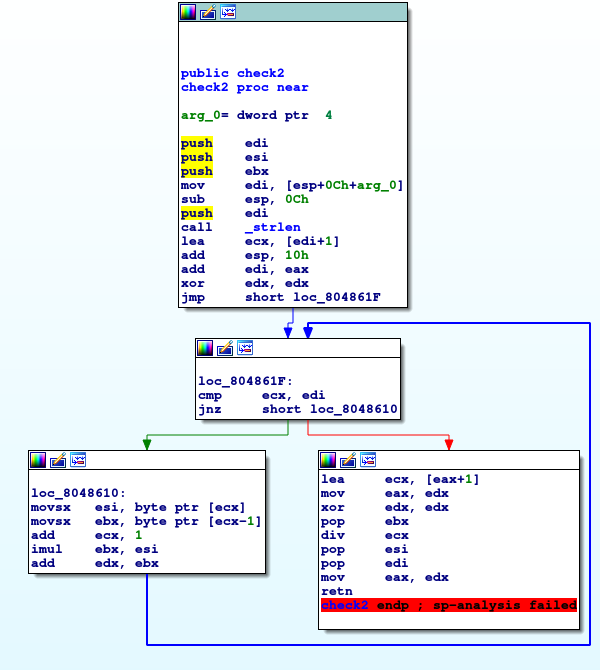
Now let's move onto the check2 function.
 Figure 3: Examining the
 check2 function in IDA.
Once again, this function seems awfully similar to the check2 function in Ex2_2 but much simpler.
This is because of a few reasons; calculating the length of the string (except with the strlen function this time); the body of the loop extracting two characters at a time; calculating a sum based on the two characters and the
div
instruction after the loop.
The only difference between the two functions is really only in the main body of the loop, where the two adjacent characters are extracted (represented in ASCII) and then multiplied together and added to a total stored in the edx
register.
After this, the value $sum \mod len(enteredString) + 1$ is calculated (the same way as in Ex2_2 check2).
This value is then returned to main.
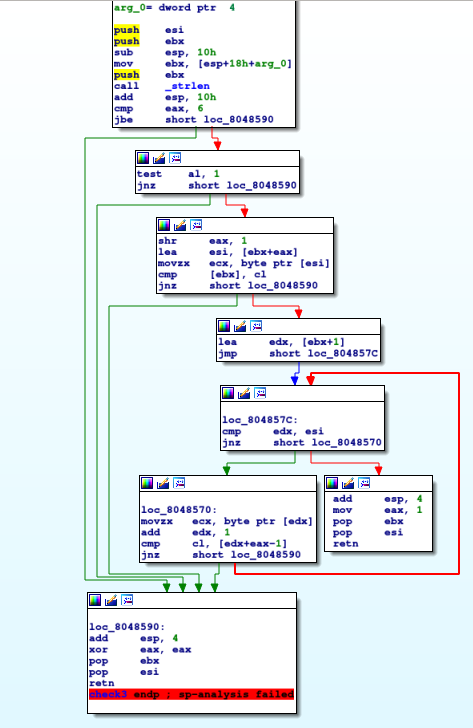
Now let's take a look at the final function check3:
 Figure 4: Examining the
 check3 function in IDA.
Just by looking at the structure of the graph, we can see that a lot of conditions must be satisfied and we must follow the red arrows. This is because there is only one way to reach the final block which consists of the mov
eax 1 instruction but there are multiple ways of reaching the block labelled loc_8048590.
Looking at the first block of code, we can see that the length of the entered string is being compared to 6, from this we can infer that the entered string must be more than 6 characters long.
Now moving onto the second block, the test instruction is used to calculate the bitwise AND of the two operands, but the result is not stored, it is used to set the flags. The al register is the lowest byte of the
eax register which currently stores the length of the string.
The jnz instruction essentially checks if the two arguments are equal to 0 or not. By performing a bitwise AND on 1 and checking if it is equal to 0 or not, this is equivalent to checking if the entered string is of even length.
The next block of code starts off by dividing the contents of eax which contains the length of the string by 2. This is done by a bit shift to the right by 1.
What happens afterwards is that a pointer to the character (of the entered string) at the index of the just calculated number is compared to the first character in the entered string. If they are equal then the program proceeds to the next
block. Double checking this with GDB confirms this to be the case.
To give an example, consider the entered string "asdfasdf". eax would contain 4, the length of the string with right bit shift 1. Register esi points to the second 'a' in "asdfasdf" and is being compared to
the first 'a' in the string. As they are equal, the program goes forward.
The blocks (loc_804857C and loc_8048570) following this are, in my opinion, the trickiest to understand, however using GDB helped a lot with this.
These blocks form a loop, a loop which checks if the entered string, when split in half, are equal. We know this to be true because esi contains a pointer to the second half of the string; eax contains an offset
(len(enteredString) / 2 ), which when using during the iteration of the loop, allows you to access the same index in the second string. This is done in the cmp instruction.
In conclusion, this function on return, a valid entered string would return 1 whereas an invalid string would return 0.
Putting this all together, going back into main, we now know all the return values for each of the functions; check1 returns 0 or 1; check2 returns an integer in the range [0, len(enteredString] ;
check3
returns 0 or 1.
All of these return values are multiplied together, as seen by the multiple imul instructions with the registers containing the return values like in Ex2_2. This result is then compared to the length of the string, if they are
equal
then the entered string is a valid password, else invalid.
An example of a valid string is $aairaair$.
To summarise, the set of valid passwords satisfy the following conditions:
- All characters in the password are lowercase [a-z]
- The password must be greater than 6 characters and of even length
- The password must consist of two repeated words put together, e.g. aairaair
- The password must satisfy the formula $total \mod (len(password)+1) == len(password)$ where $total = \sum_{i=0}^{n-2} password[i] * password[i+1]$ where the $i^{th}$ index of the password is an ASCII number (See program below for more information)
In order to generate more passwords, here is a Python program that does so:
    import sys
    import string
    from itertools import chain, product

    def bruteforce(charset, maxlength):
        return (''.join(candidate)
                for candidate in chain.from_iterable(product(charset, repeat=i)
                for i in range(1, maxlength + 1)))


        string = string.lowercase
        for attempt in bruteforce(string, 6):
            if len(attempt)<4:
            continue
        password = attempt*2
            total = 0
        for i in range(len(password)-1):
                total += ord(password[i])*ord(password[i+1])
            finalVal = total % (len(password)+ 1)
        if finalVal == len(password):
                print(password)